New Router: BananaPi R3 - Part 2 - Flashing
By Adam on 27 Oct 2024, 07:38 - Homelab - Permalink
Part 1 is here.

Now that the router is assembled, the next step is to decide where to flash the firmware. As I mentioned in the last post, this device offers a handful of options. Firmware can be flashed to the NOR, NAND, eMMC, or simply run from the SD card. From what I've read, it's not possible to boot from an m.2 card, though. That option is only for mass storage.
After a bit of reading, my decision was ultimately to install to all four! Sort of...

The DIP switches and the leads connecting to the UART
My plan is to install a "clean" OpenWRT image to both the NOR and NAND. The NAND image will be fully configured into a working image, and then copied to the eMMC. The eMMC will then be the primary boot device going forward. If there's a problem with the primary image in the future, I would then have a cascading series of recovery images available. At the flip of a switch, I can revert to the known working image in the NAND, and if that fails, then I can fallback to the perfectly clean image in the NOR.
..And I do mean "at the flip of a switch". Due to the way that the bootable storage options are connected, only 2 of the 4 can be accessed at a time. Switching between NOR/NAND and SD/eMMC requires powering off the BPI and toggling a series of 4 dip switches, as seen on the official graphic below:
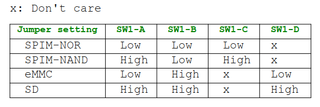
Switches A and B determine which device the BPI will attempt to boot from. Switch C sets whether the NOR or NAND will be connected and switch D does the same for the SD and eMMC. To copy a image from the SD card to the NOR, for example, switch D must be high (1) to access the SD card, and switch C must be low (0) to access the NOR. Since switches A and B set the boot device independent of which devices are actually connected, it would seem that you could set them to an impossible state to render the device unbootable, like 1110, or 1001.
To accomplish my desired install state, I had to first write the OpenWRT image to the SD card on a PC, and then insert it into the RPI. With the the switches to 1101, I could write the image from the SD card to the NOR, then flip the switches (with the BPI powered off) to 1111 to copy the image to the NAND. Lastly, I can remove the SD card and reboot with the switches in 1010 to boot from the NAND. Then I'll configure the BPI into my fully configured state. This is the step I'm currently working on. I have it about 80% configured, but will need to actually install it in my network before I can complete and test the remaining 20%. Once it is installed, tested, and fully configured, I'll copy the NAND to eMMC, before finally setting the switches to 0110 and booting from the eMMC for ongoing use.

Unfortunately, I haven't had a good opportunity to take my network offline to install the new router, so the last bit of configuration might need to wait a little while...